Puzzle Cube Project

In this project, the steps of the design process were followed in order to map out a way to create a puzzle cube, actually build it, and then create the cube on Inventor. Five constraints were given:
1) The finished cube size was 3 x 3 x 3
2) Exactly 5 parts
3) All parts were unique
4) The parts must interlock
5) The smallest part was 4 blocks
1) The finished cube size was 3 x 3 x 3
2) Exactly 5 parts
3) All parts were unique
4) The parts must interlock
5) The smallest part was 4 blocks
The brainstorming begins in order to generate concepts. Plastic cubes were even used to help generate cube combinations.

one to six cube combos
|

more brainstorming
|
Two puzzle ideas made up of the bottom, middle, and top.
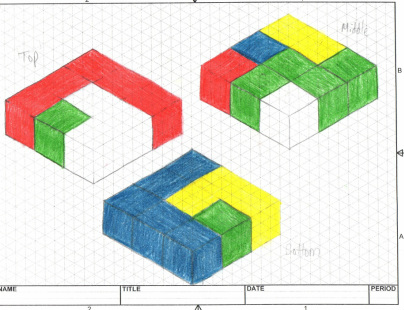
Puzzle Cube #1
|

Puzzle Cube #2
|
Decision Matrix

The next stop on the puzzle cube design process was developing a solution. In developing a solution, the puzzle cube had to go through a decision matrix, a systematic way to rate possible solutions on specific criteria in order to pick the best solution. This decision matrix incorporated all of the criteria using a scale from 1-10 with 10 being the best. Puzzle cube #1 received a 10 for being challenging, 8 for being solvable, 7 for stability, and 8 for being aesthetically pleasing. Puzzle cube #2 received a 9 for being challenging, 8 for being solvable, 8 for stability, and 6 for being aesthetically pleasing. Therefore, puzzle cube #1 was chosen because it had a total of 33, two more than puzzle cube #2.
Puzzle Cube #1 was chosen. Now it was time to begin to hand-draw different isometric views of the cube so that the prototype could be constructed and tested.

|

|

|

|

|

One dimensioned drawing made on Inventor
All five parts were then made on Inventor.

|

|

|

|

|
The parts of the cube were now constructed ... now it was time to assemble the cube on Inventor.

The cube was put together, forming a solution that fit under the constraints that were given. A video presentation of the cube coming together was also made.
The physical model was now formed! However, the solution, after being evaluated, needed to be reshaped because the green piece did not fit completely in the cube. The green piece was remade by hand, and the solution, fully intact, was now ready to present!

|

|

|

|
