Train Project
In this project, my group of four worked together as a team to create parts of a train on Inventor that would be used to assemble the train. I worked with Jimmy, Brian, and Jasmin on this project. After being given a packet with diagrams that showed the train pieces and their dimensions, we were faced with the task of electronically creating the parts. We split up the workload so that each of us made a few parts in the project. One part was made by all of us as a class. After all of the parts were made, we sent each other the parts so that we could assemble our own train. We eventually used a drive constraint to make the train move down the track.
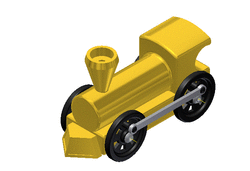
My part of the project involved making the stack and wheel. I made the wheel by creating an initial picture of the inside of the wheel using the proper dimensions from the packet. After creating the inner picture, that shape was revolved around the center point. The design on the wheel itself was extruded and a circular pattern of six was made.
The other part I made was the stack. The internal stack shape was made using the dimensions given on the packet. This shape was revolved around the center axis. Then, the bottom edge was chamfered 0.01 in. by 45 degrees.
The other part I made was the stack. The internal stack shape was made using the dimensions given on the packet. This shape was revolved around the center axis. Then, the bottom edge was chamfered 0.01 in. by 45 degrees.

|

|
I learned new techniques while applying a few techniques in a different way during this train project. First, I learned how to use the insert command to assemble the parts together. I then learned how to chamfer the bottom edge of parts such as the stack. Also, I learned how to use the drive constraint to move the train down the track. I applied old techniques in a new way by using the revolve function. In the past, I used the revolve feature to revolve a simple shape around an axis. However, the train project had me revolving a complex shape in order to form a complex item such as a wheel or stack. My favorite part of the project came once all of the parts were made and we were ready to assemble. This assembling portion of the project was my favorite part because it was cool to see all of our hard work come together to create an actual train. All of the pieces fit together and the movement of the wheels causing our trains to move made the project really come to life! I didn't like the overwhelming/challenging nature of the project to begin with, but it eventually grew on me as I embraced the challenge ready to succeed in the end. Also, the length of the project was sometimes overwhelming as well because the project seemed to go on and on with there always being more things to do.
Assembling of the Train
After all of the train parts were made, assembling became the next step. Parts were assembled using the newly learned commands such as the insert command.
Time to put the train on the track
The assembled train was mated and flushed on Inventor to place it on the track. The next step was to get the wheels to move so that the train could move down the track.
|
Moving the train down the track
By driving the constraint of the angle of the wheels on Inventor, motion was created and the train successfully moved down the track.
|
Blinged Out Train

The assembled train itself was then transformed with a few added features. First, a conductor was placed on top of the train to oversee its travels. The initials AZ were placed on the front of the train body in honor of the creator himself. Optical illusions were placed on the front of the cow catcher to confuse and amaze an potential cows that were to be caught. The wheels had an extra rim added to them. Also, the design of the wheels was changed to a cool metallic/chrome color.
Blinged Out Train Scene

The assembled train then had some extra features added to it to "bling out" an entire scene. A stone tunnel was made for the train to travel underneath. An additional train with a cart carrying a circus elephant was put behind the gold colored train on the track. Two people were tied to the end of the track after being put there by a countryside vandal.. Also, the end of the train track was abruptly cut off by the vandals. This left the track dropping off into the nearby pond below that is surrounded by a circle of trees. This scene depicts a blinged out train and the circus elephant headed for looming danger.
